Integrating Google Analytics, Google Tag Manager and WordPress
February 06, 2018
Intro
Analytics packages can provide a great deal of information about who is on your site, how they got there and what they did. Many business rely on Google Analytics in combination with the WordPress CMS platform. If you want to improve your site’s performance, and understand how your campaigns are performing, it is critical to have an analytics package on WordPress.
This step-by-step guide will show you exactly how to do that. We’ll walk you through how to create a Google Analytics account, configure Google Tag Manager with your Google Analytics, install Google Tag Manager on your site and make sure it is collecting information about user behavior on your site. The good news is that you don’t need to be a sophisticated developer to make all of this work flawlessly.
The Rationale for Container Tags
You have two distinct options when it comes to adding tracking codes to your web and mobile sites. You can either add them directly or manage them through a container tag. A container manages all of the tags, pixels and scripts you’ll need to track campaign and site performance in a single place. Most importantly, containers allow you to manage all of your tracking needs without disturbing your site. If you want to take a deep dive into how tag managers work, here is a great place to start.
Containers enable the marketing and advertising teams to manage their analytics strategy without involving developers or IT. It fully separates your site’s code and management from tracking. It also removes a variable from validating the analytics QA.
Most importantly, container tags add an additional layer of IT (and IP) security. Over time, teams will often be adding tags for everything from validating content strategy to enabling campaign management. More often than not, these tags aren’t removed when they are no longer useful. Container tags centralize management of and visibility into all your company’s tracking pixels. These pixels collect, monitor and report user information to your and your vendors. Even when the campaign is over, these tags continue to collect user information. If you’ve added vendor’s pixels to your site, that information can be provided to 3rd parties who may be a direct competitor. Vendors who use piggyback pixels further obscure who is storing and selling that information. Removing obsolete or unused pixels should be an important piece of your IT security and IP protection strategy. You don’t want a data breach. Container tags help alleviate that risk, and regular reviews of what is on your site will help make sure only actively used pixels are currently on the site.
Our step-by-step guide to adding Google Analytics to your WordPress site will leverage Google Tag Manager. If you choose, you can add Google Analytics directly to your site through a plugin.
Tools You’ll Need
Here’s what you’ll need:
- Google Analytics Tracking ID.
- Google Tag Manager code snippets.
- Editor credentials for the WordPress site.
Creating a Google Analytics Tag
You’ll need to either establish a Google Analytics account, have your Google Analytics administrator grant you access to your company’s account, or otherwise secure the UA code (it looks something like UA-150421783-4). Jot that UA code down. If you forget, or your jotter is broken, here is how you retrieve it later.
If you already have Google Analytics, we recommend managing all of your company’s digital properties (web sites, mobile sites, apps, etc.) through a single Google Analytics account. You should have one “property” in your Google Analytics account for each site or app you are tracking.
Congratulations! The first step is complete.
Configure Your Container Tag
It doesn’t take too much time to configure a fresh container tag for Google Analytics. Google generally does a great job making sure their products work well together, and Google Analytics and Google Tag Manager are no exception.
Here’s what you do:
-
- Surf on over to your Google Tag Manager account.
- Create an account for the new site so you can separate its management and reporting from other companies or sites you manage. The only information you’ll need is the name of the company or account, and the site’s URL.
- Make note of the container tag scripts at the end of the account creation process.
- Create a Google Analytics tag within Google Tag Manager. Click on “ADD A NEW TAG” . You can also click on “Tags” in the vertical menu to the left, and then on the bright red “NEW” button.
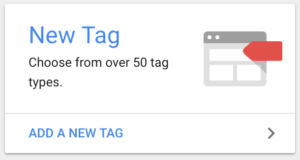
Create a new tag in Google Tag Manager
- Name the tag by replacing “Untitled Tag” with something more useful.

Name the tag ‘Google Analytics.’
- Click anywhere in the Tag Configuration box to create a new tag.
- Select Universal Analytics from the menu that pops in from the right. If you didn’t just create your Google Analytics account, verify you aren’t using Classic Google Analytics. Chance are really good you are using Universal Analytics.
- Set Track Type to Page View.
- Choose ‘Create a new variable’ underneath ‘Google Analytics Settings.”
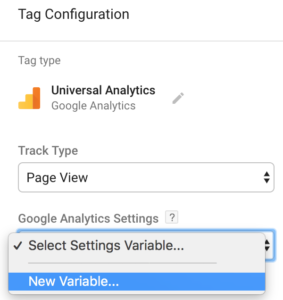
Choose ‘Create a new variable.’
- Add Google Analytics Tracking ID to the box labeled “Tracking ID.” Once you enter a value, a bright blue “Save” button will appear in the upper righthand corner. Click on it.
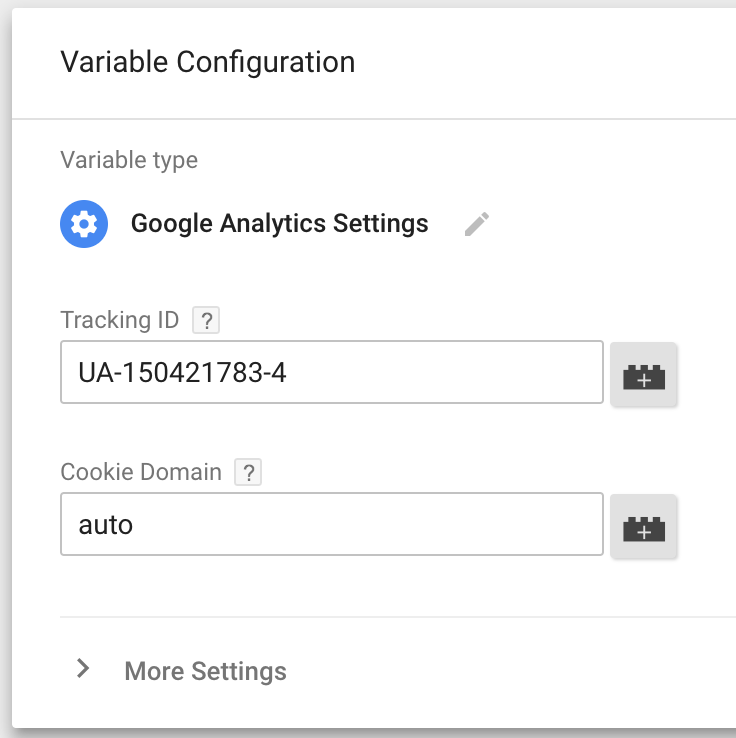
Add Google Analytics Tracking ID.
- Configure Triggering by clicking anywhere in the box in the bottom half of the screen.

Click anywhere in the ‘Triggering’ box.
- Choose ‘All Pages’ under Triggers. We want this tag to fire each time a page is loaded by anyone. You should set up filters within Google Analytics to handle any sort of reporting rules (like blocking traffic from people who work in your office).
- Publish your tag. Click on “Submit” workspace changes and then hit Publish.

“Submit” workspace changes.
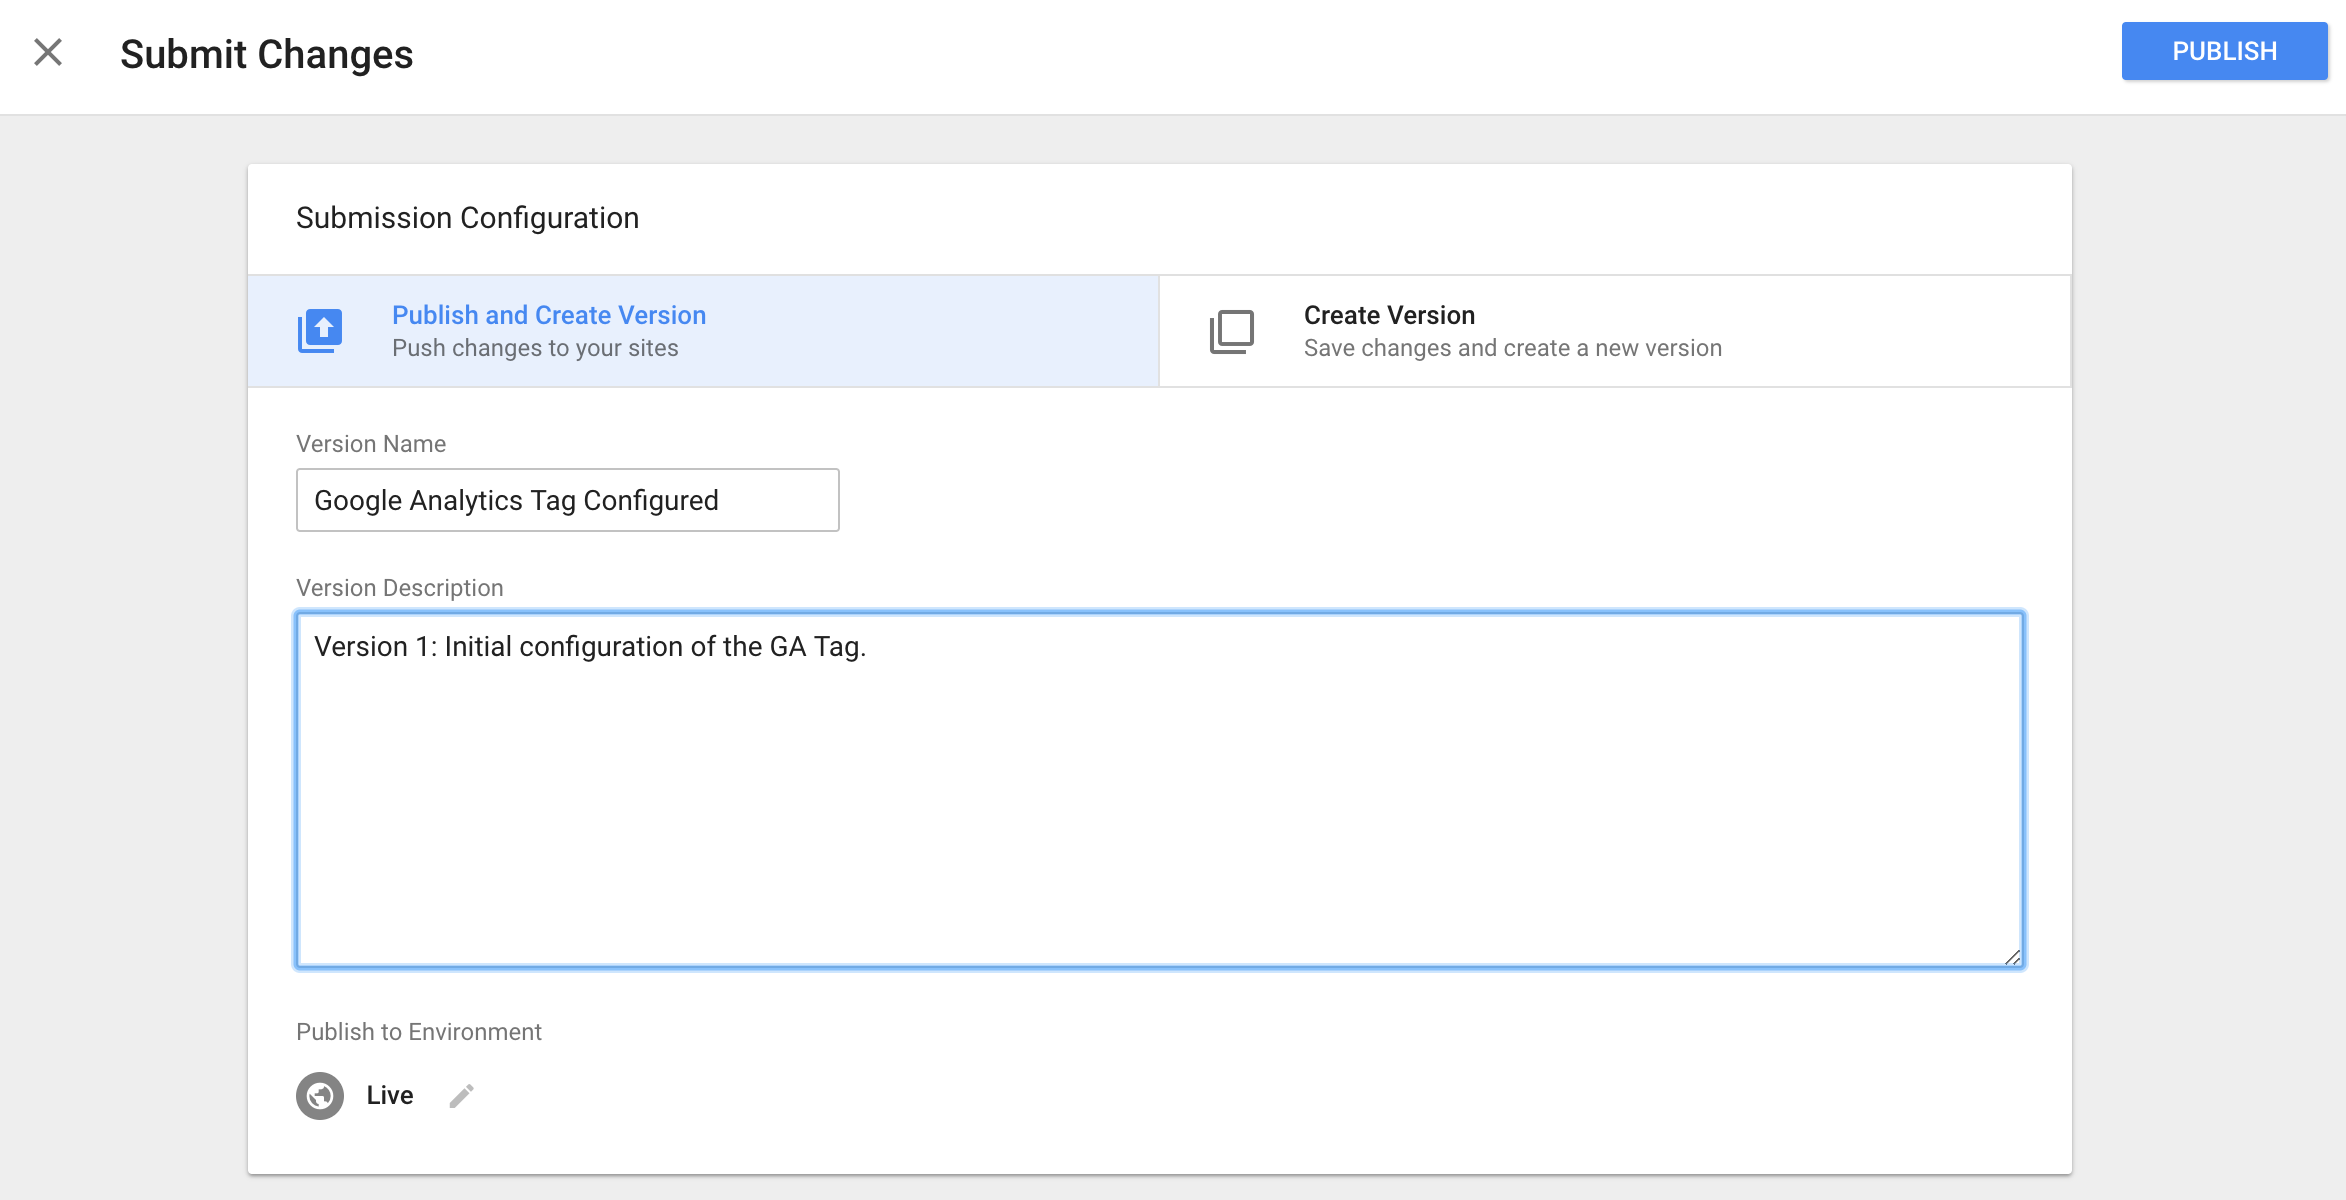
Hit ‘Publish.’
Add Container Tag to Your WordPress Site
This may be the most intimidating step, but it’s pretty easy. You now need to “install” the container tag on your site. You do that by simply adding the snippets of code Google has provided to a specific WordPress section that is called every time any page is loaded.
-
- Access the Admin Dashboard of your site. You can typically get there by navigating to www.yourdomain.com/wp-admin/
- Choose Editor from the ‘Appearance’ menu.
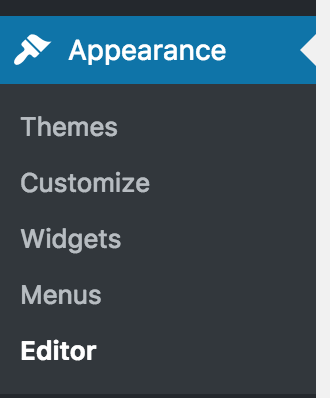
Choose ‘Editor’ from the ‘Appearance’ menu.
- Click Theme Header from the right side of the screen. It may have a different name, but it’s the header.php file that gets called on every page load.
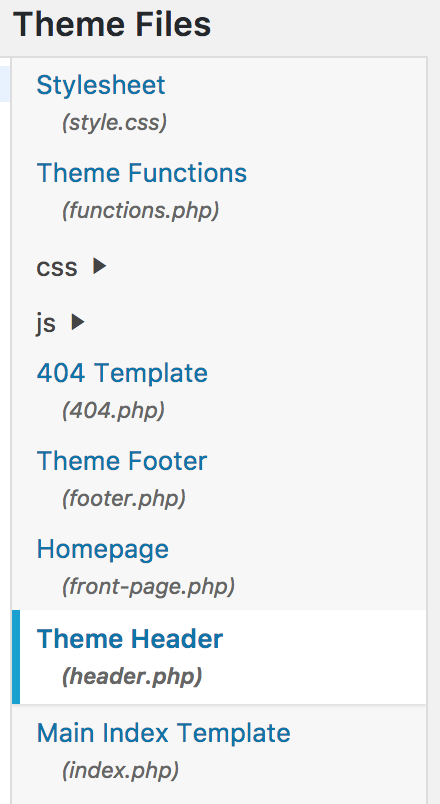
Choose header.php
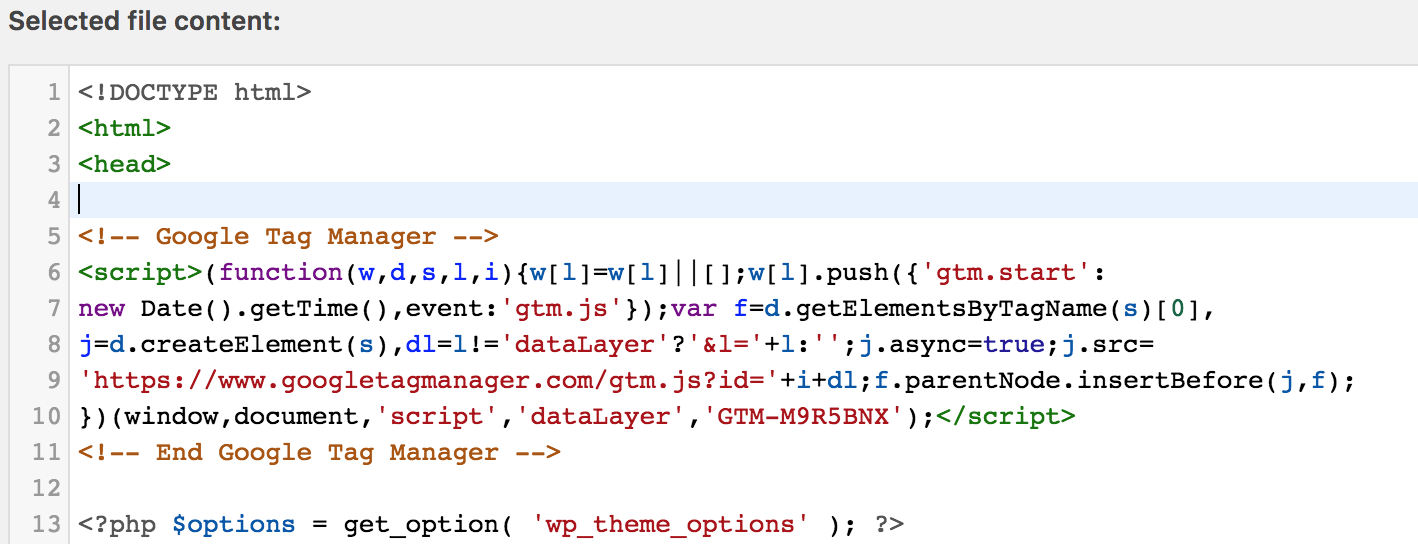
- Add the Google Tag Manager <head> snippet to the file content. You want to place it as close to the opening <head> as possible.

This is what the file looks like before…
This is what the file looks like after…
-
- Add the Google Tag Manager <body> snippet to the file content. You want to place it as close to the opening <body> as possible.

This is what the file looks like before…
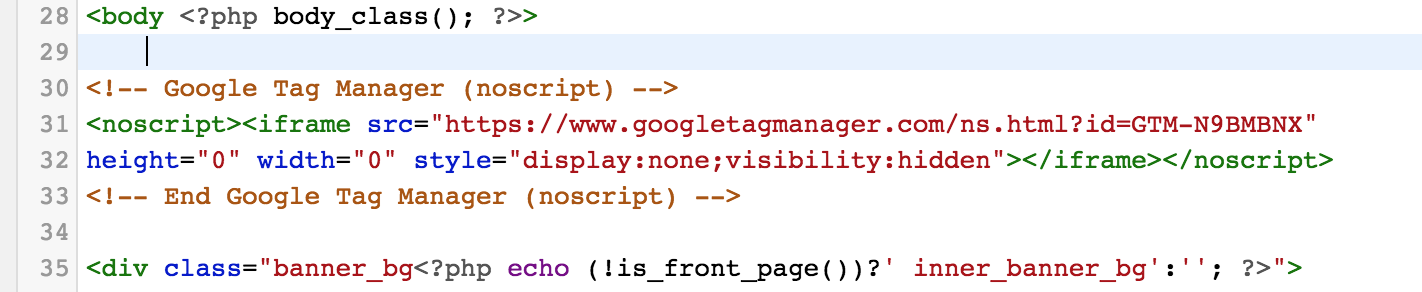
This is what the file looks like after…
QA
Now we’re going to check your work. There are a couple of ways to do this. We are going to highlight two quick ways to test the plumbing.
- Option 1: Through Google Tag Manager, you can click on ‘Preview’ for the container tag you just installed. Once ‘Preview’ is enabled, simply visit your site. If everything is all good, you’ll get a notification that your Universal Tag is firing.

Verify your work through the ‘Preview’ feature of Google Tag Manager
- Option 2: Through Google Analytics, check the real time traffic. Open up a new browser or incognito tab, visit the site from your phone, or have a friend visit your site. Click around your site for a bit. While you are hopping around the site, check out the “Real Time” report within Google Analytics.
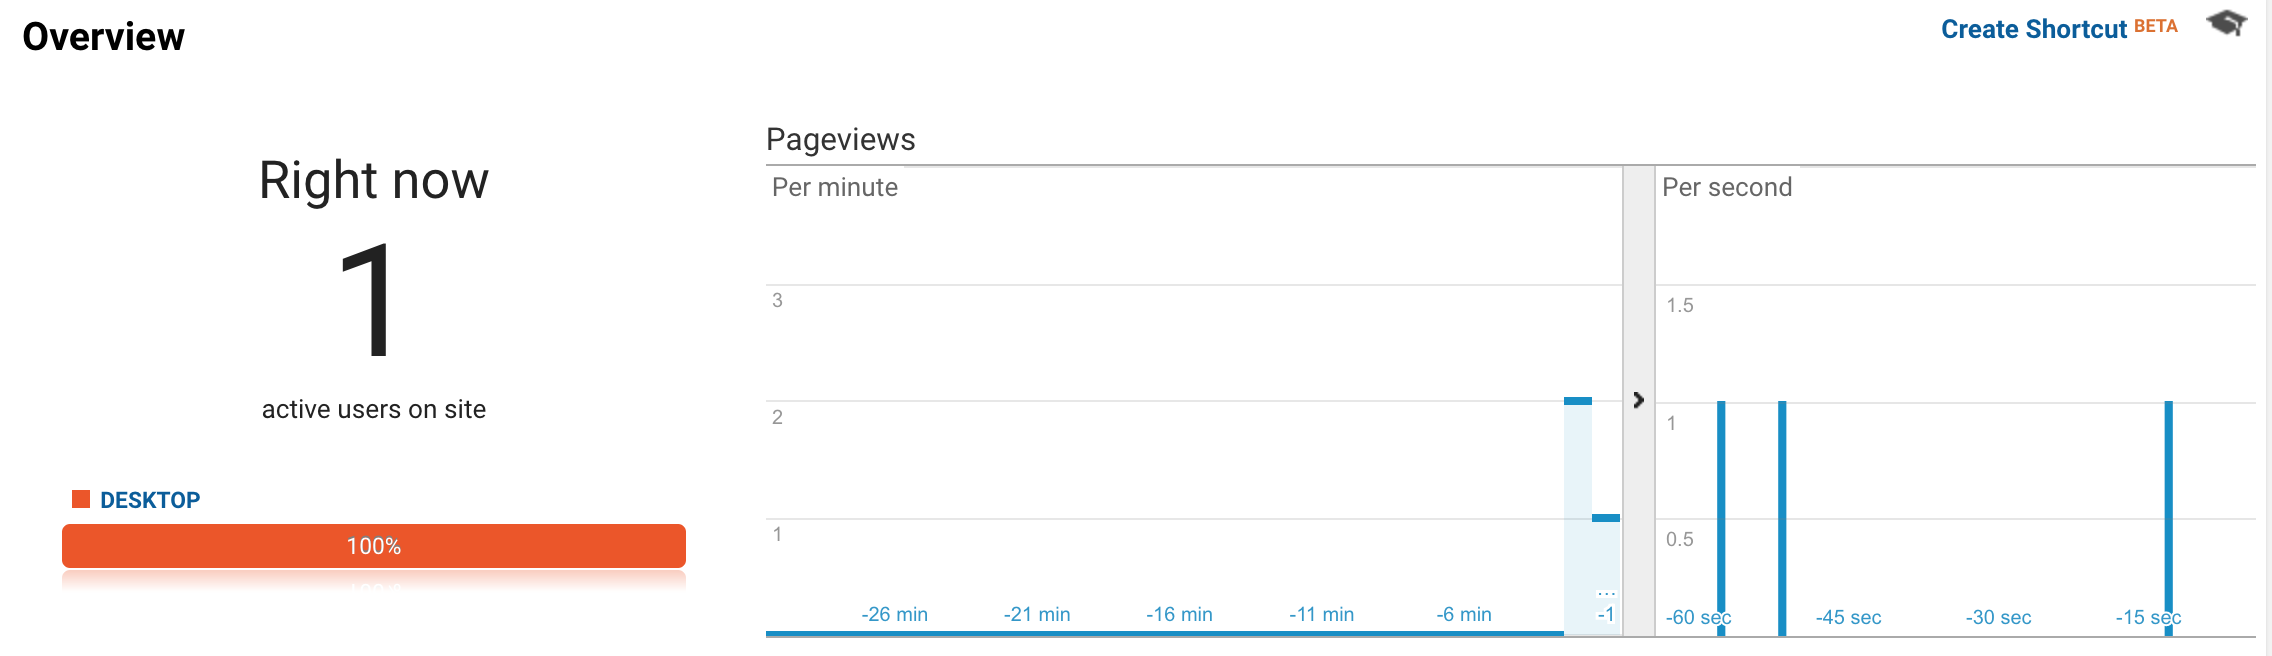
Check the ‘Real Time’ reports in Google Analytics.
Anything other than a zero is excellent. This report was produced within a few minutes of installing the tag manager on the WordPress site. If you are getting zeroes here, wait at least 24 hours before you start panicking.
Have a few pointers to share? Need help with your analytics (now that they are configured)? Call us. We’d love to chat.